
Python: программирование GUI - вам нужно знать, что
Видео по теме: (September 2024).
Программы на Python выглядят намного лучше, когда они запускаются с графическим интерфейсом пользователя. В противном случае терминал часто используется для этого. Здесь мы покажем, как вы можете программировать свой собственный графический интерфейс с помощью модуля TkInter в Python.
GUI программирование на Python: окно с TkInter
Прежде чем вы действительно сможете начать работу с графическим интерфейсом, вы должны сначала импортировать модуль TkInter и создать окно.
- Чтобы импортировать модуль, добавьте команду «from tkinter import *» и команду «from tkinter import ttk» (без кавычек) в самом начале кода.
- Теперь вы можете создать новое окно с помощью команды «root = Tk ()». Вы можете использовать другое слово вместо слова «корень». Тем не менее, рекомендуется использовать одну и ту же переменную для каждой программы, чтобы вам было легче ориентироваться в программировании.
- Вы можете указать имя вашего окна с помощью команды «root.title (« Test »)» (без кавычек в начале и в конце). В этом случае окно называется «Тест».
- В конце вашей программы вам нужно только вставить команду «root.mainloop ()», чтобы программа была завершена.
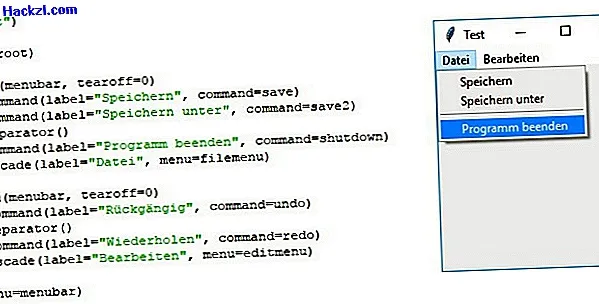
TkInter с Python: программировать строку меню
Строка меню можно найти почти в каждой программе в эти дни. Вы также можете легко запрограммировать их с помощью модуля TkInter.
- Важно, что вы уже выполнили все вышеперечисленные шаги. Код для строки меню должен быть вставлен между «root.title (« Test »)» и «root.mainloop ()».
- Вы должны начать программирование строки меню с помощью команды "menubar = Menu (root)" (без кавычек).
- Вы можете создать первый пункт меню с помощью команды "filemenu = Menu (menubar, tearoff = 0)". Вместо переменной filemenu вы также можете выбрать свою собственную переменную.
- Добавьте первый подпункт командой "filemenu.add_command (label =" Save ", command = save)". В этом случае этот подпункт называется «Сохранить». Если вы нажмете это, команда «save ()» будет выполнена. Важно, чтобы вы определили команды в коде перед командой «root = Tk ()».
- Теперь вы можете добавить столько подпунктов, сколько захотите. Совет: Вы также можете использовать команду filemenu.add_separator (), чтобы добавить разделительную линию между отдельными подпунктами.
- Когда вы закончите с пунктом меню, не забудьте добавить команду "menubar.add_cascade (label =" file ", menu = filemenu)". Эта команда дает пункту меню имя «Файл».
- Если вы хотите добавить дополнительные пункты меню, вам нужно всего лишь изменить переменную пункта меню, чтобы не возникало ошибок. Вместо «filemenu» вы можете использовать «editmenu» каждый раз.
- Не забудьте добавить команду «root.config (menu = menubar)» перед командой «root.mainloop ()» в конце кода, чтобы также отображалась строка меню.
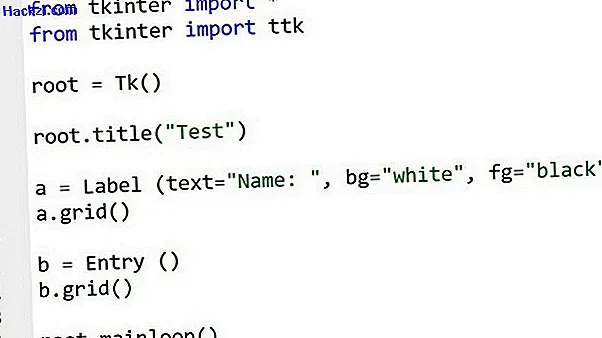
GUI с Python: добавить метки и записи
Теперь вы можете начать добавлять тексты и текстовые поля в вашу программу Python.
- Вы можете добавить первую метку с помощью команды "a = Label (text =" Name: ", bg =" white ", fg =" black ")" (без кавычек). Эта метка представлена переменной «a» и имеет текст «Name:». Цвет шрифта текста черный, а фон белый.
- Чтобы метка отображалась, вы должны написать команду «a.grid ()» под ней. В следующем параграфе вы узнаете, для чего вам нужна grid ().
- Вы можете создать текстовое поле с помощью команды "b = Entry ()". В этом случае текстовое поле представляется переменной «b».
- Опять же, вы должны снова вставить команду grid: "b.grid ()"
Программирование TkInter: Grid and Pack - Менеджер геометрии
Вы, должно быть, задались вопросом, для чего вам нужна команда grid:
- Эта команда является менеджером геометрии. Если круглые скобки пусты, это ничего не делает.
- Однако вы можете изменить свою команду следующим образом: "b.grid (row = 1, column = 1, sticky = W)". Текстовое поле теперь будет в строке 1 и в столбце 1 и выровнено по западу (левый край экрана).
- Вы можете использовать команду сетки, чтобы указать положение и ориентацию отдельных объектов. Обратите внимание, однако, что с этой командой строка 0 является первой строкой, а столбец 0 является первым столбцом.
- Помимо менеджера геометрии сетки, есть также менеджер геометрии пакета. Примером может служить команда "b.pack (side = 'top', fill =" x ", padx =" 5 ", pady =" 10 ")". С помощью атрибута «side» вы можете определить положение в графическом интерфейсе. Атрибутом «fill» вы можете настроить высоту и ширину компонента GUI для данного фрейма. С помощью «padx» и «pady» вы можете определить пространство вокруг компонента GUI.
- Однако обратите внимание, что вы можете использовать либо сетку, либо менеджер геометрии пакета в программе Python. Но никогда не одновременно.
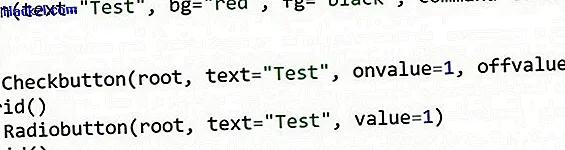
Программирование GUI: добавление кнопок
Очень часто кнопки также можно найти в программах. В Python есть три важные стандартные кнопки:
- Например, вы можете добавить обычную кнопку с помощью команды "button1 = Button (text =" Test ", bg =" red ", fg =" black ", command = test1)" (без кавычек). Если эта кнопка нажата, функция «test1 ()» выполняется.
- Помимо обычных кнопок, есть также так называемые кнопки проверки. Примером этого может быть «checkbutton1 = Checkbutton (root, text =« Test », onvalue = 1, offvalue = 0, variable = var1)». Важно, чтобы вы вставили команду «var1 = IntVar ()» заранее. Это единственный способ, которым программа знает, что переменная «var1» является целочисленной переменной. Если флажок активирован, «var1» принимает значение «1» (значение по умолчанию). Если флажок не активирован, предполагается значение 0 (смещение). Совет: Вы можете узнать это значение с помощью команды "var1.get ()".
- Наконец есть кнопка радио. Вы можете добавить это с помощью команды "radiobutton1 = Radiobutton (root, text =" Test ", value = 1)". Все переключатели, имеющие одинаковое значение в поле «значение», активируются, как только активируется одна из этих кнопок. Следовательно, вы должны вводить разные значения каждый раз, чтобы активировать только одну кнопку.
- Кстати, не забывайте управлять кнопками с помощью менеджера сетки или геометрии упаковки.
Python: скрыть терминал
Терминал обычно отображается для каждой программы Python - независимо от того, с графическим интерфейсом или без. Однако это очень раздражает, особенно для программ с графическим интерфейсом. Тем не менее, вы также можете скрыть это. Теперь мы покажем вам, как это сделать в Windows 10:
- Запустите проводник и нажмите на вкладку «Вид».
- Теперь убедитесь, что установлен флажок «Расширения имени файла».
- Переименуйте файл Python, чтобы расширение файла больше не .py, а .pyw.

Дополнительные советы о Python в наших руководствах по ЧИПу
Подсказка: Вы можете найти дополнительные учебники по программированию на нашей странице темы языка программирования Python. Там мы покажем вам, например, как вы можете использовать функции range и xrange.
$config[ads_text6] not found